Sourdough Bread from It’s Alive
How hard can it be: Straightforward, but surprisingly time consuming
Overall Flavor Rating: 5/5
Recipe: From It’s Alive with Brad Leone and Claire Saffitz

What went well:
The bread is really delicious.
The totally unfancy dutch oven-ish thing I used worked perfectly.
The bread “sprung” in the oven!
What went poorly:
It turns out that scoring bread is an art form you can’t master with one 10 minute YouTube video.
You should definitely use a bench scraper when flipping the dough over, that instruction wasn’t fake.
Just here for the recipe? A compact version is available at the bottom.
Remember when we thought this whole pandemic thing would be over in two weeks? And then it was four weeks and we couldn’t believe it? And now it’s been over a year and every day feels the same and you’re slowly going insane? Well anyway, this recipe harkens back those simpler days when we were all baking bread and pretending everything would blow over in a few weeks.
There’s a good reason everyone was making bread at home: fresh homemade bread is really, really good. Well, homemade bread can be really good if you get the right recipe. My first handful of attempts at homemade sourdough used this King Arthur recipe and it never worked. Not a single time. And I swear I followed the instructions! Ok, maybe one time I forgot to add any salt. But the other two times I swear I followed the instructions!
After three failed attempts at homemade sourdough, I was pretty disheartened, but still determined to give it one more shot. I would not be bested by a bunch of microorganisms.
Prior to the complete meltdown of Bon Appetit’s YouTube empire, I was an avid follower of their channel. Consequently, I figured there had to be an episode of It’s Alive talking about sourdough and sure enough, there was.
Shockingly, there’s not an official BA page that has the recipe shown in the episode. I found a handful of places where people tried to jot down the instructions, but I couldn’t find anything definitive.
And so, I set out to make the bread and write down the full and complete instructions once and for all. Is this basically just another person trying to jot down the instructions? ….yes. But somehow in my mind this is more legit. Just go with it, ok?
Like usual, I’ll talk through how it was to make this recipe, but if you just want to see the recipe, I’ve written it up without my additional commentary at the end.
As a quick note before we begin, a sourdough starter is key to making sourdough bread. If you don’t have one, you can make one yourself using my recipe. Or, if you don’t want to wait a week, call around to local bakeries and they should be able to get you some.
Forming the Dough
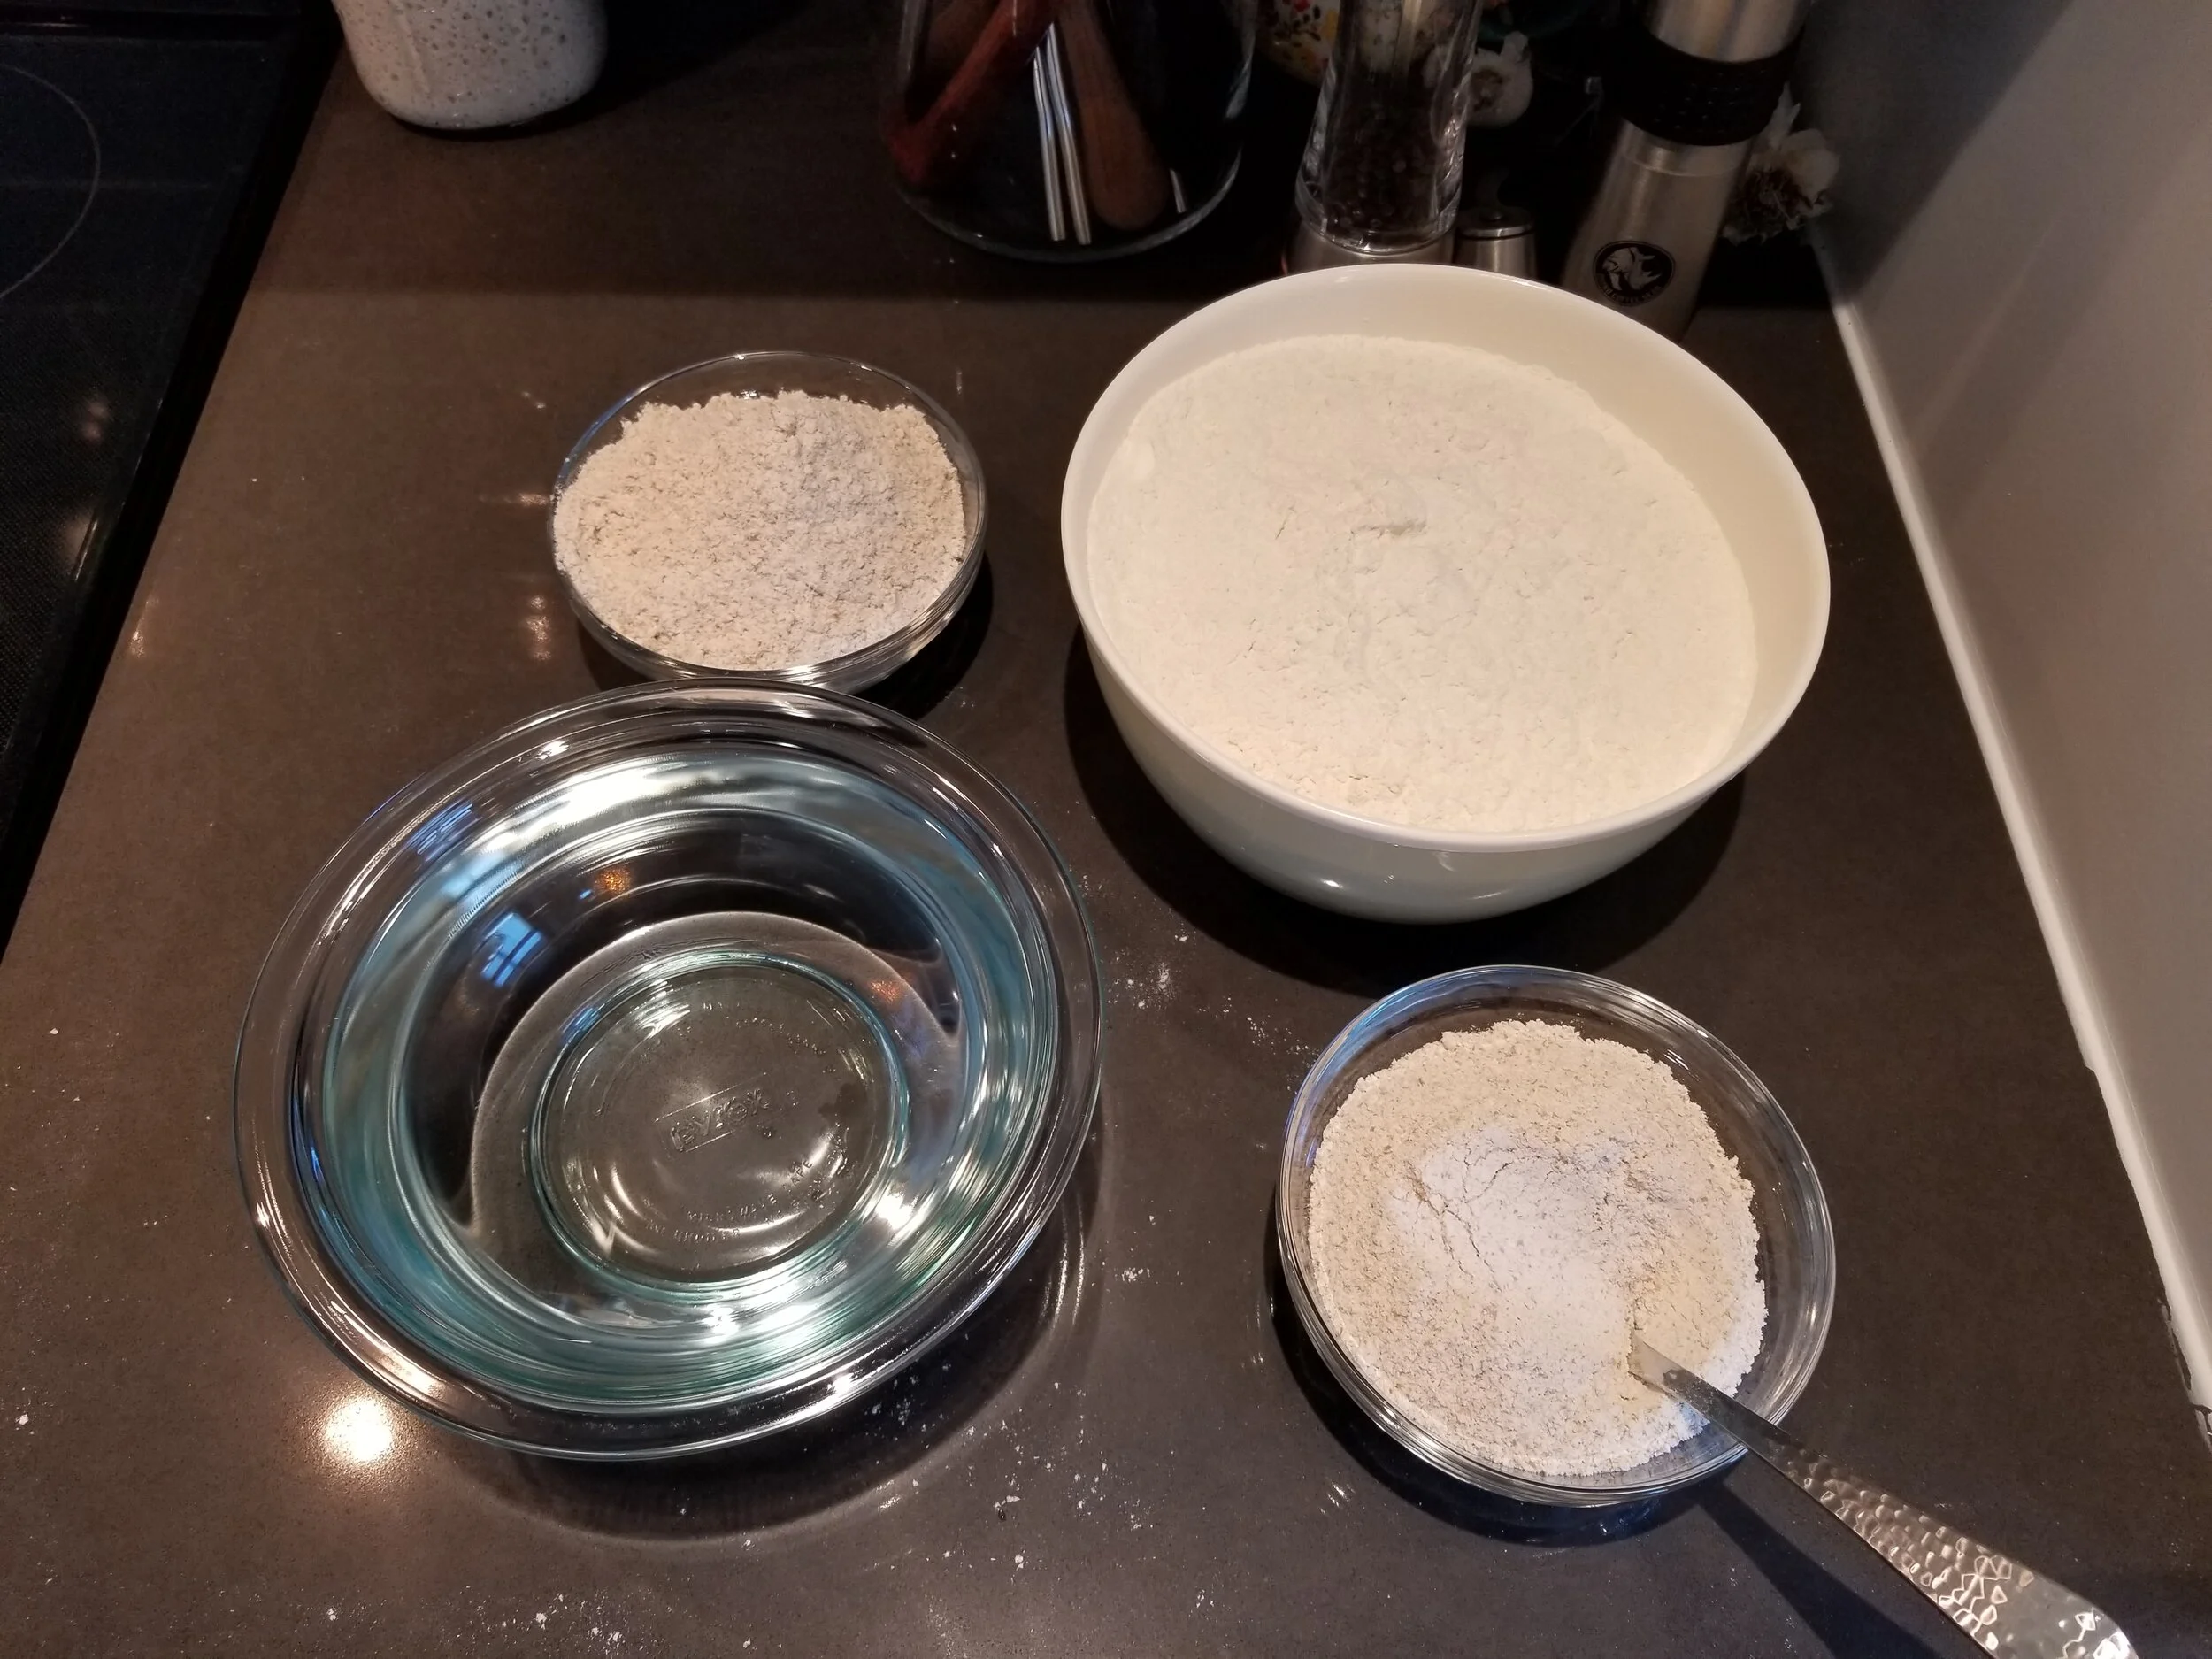
Like most breads, the first thing you need to do is form the dough. To start, you’ll need:
750 grams of white bread flour
150 grams of whole wheat flour
100 grams of spelt, rye, or more whole wheat flour
750 grams of water
If you’re like most people in the world and don’t have spelt or rye flour, just use more whole wheat and don’t worry about it. I had spelt on hand because I used to live near an awesome baking supply place with free delivery (and it turns out that a charming local business with free delivery is exactly the combination you need to sucker me into buying an egregious quantity of exotic flour).
In a largish bowl, combine together the dry ingredients and give them a good mix. According to food god Sohla El-Waylly, most people aren’t mixing their dry ingredients enough, so really give them a thorough mix.
When you think the dry ingredients are combined, add in the water. Then using your most grandma-esque wooden spoon (or really whatever utensil you want), mix the whole thing together until no dry flour remains.
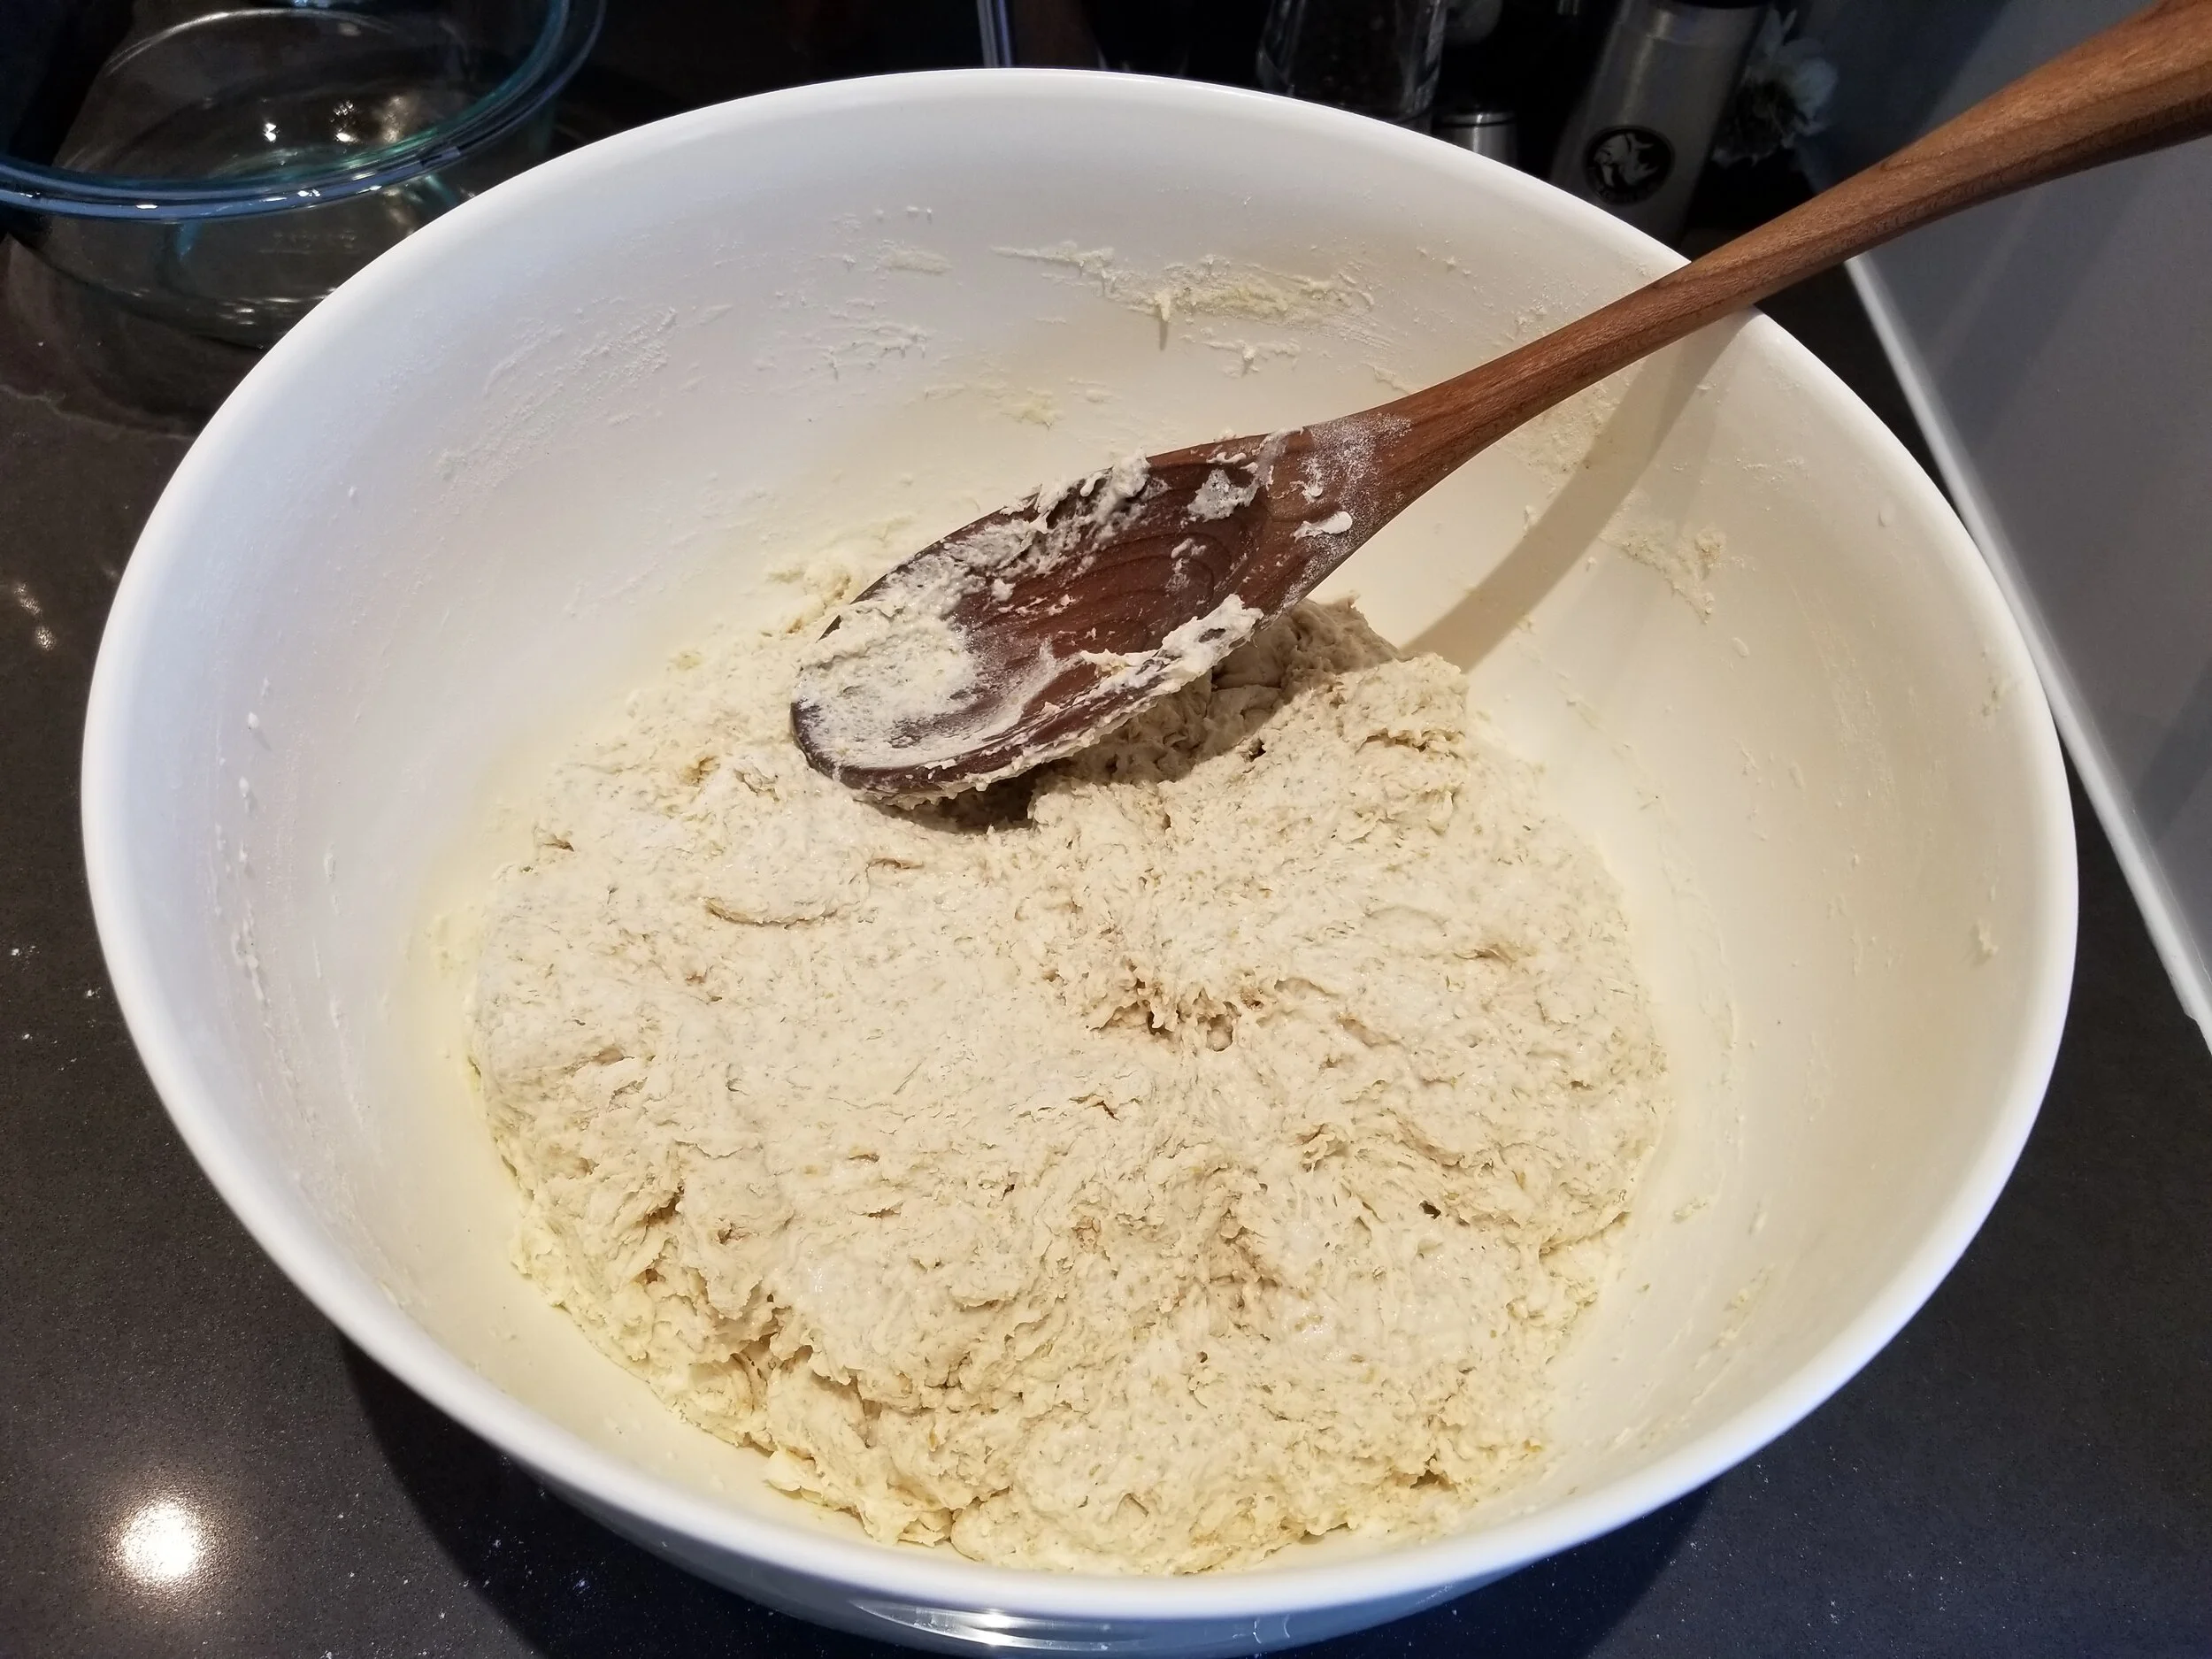
Now let this whole mixture sit for 30 minutes (or up to two hours) in a process called “autolyse”. While I don’t totally understand the science here, apparently this will improve the gluten structure of the bread which will make it superior to non-autolysed bread. Some of you will ask what happens if you skip this step and the honest truth is that I have no idea.
30 Minutes Later
After waiting the requisite time, you are now ready to add your sourdough starter to get the fermentation party started. For this step you will need:
200 grams of sourdough starter
20 grams of salt (preferably something non-iodized, but use what you’ve got)
50 grams of water

Dumping all of the salt right into your starter will not make your starter super happy (in fact it might kill some of it). So before adding any of the salt, first add all of the starter.
In the It’s Alive episode, Claire says that you want to pinch the starter into the dough. I tried doing a little crab claw thing for a bit, but it seemed like it wasn’t working and was going very slowly. Instead I just mashed the whole mixture in my hands like I was trying to claw my way to the bottom of the bowl. Since I ended up with tasty bread, I have decided that this method also works.
When the starter is fully incorporated, you can now add the salt and water. The water is there just to help you work the salt in. Sprinkle the salt across the top of the dough, pour the water over, and repeat the mashing/clawing of the dough until everything seems well distributed and fully incorporated.
Now that all of the ingredients are in, the slapping phase begins. Your hands are going to get absolutely covered in dough here, so to make life easier you’ll want to do a bit of prep work. Find yourself a bowl large enough to allow the dough to grow a bit. If you have a bowl with a lid, that’s ideal because you’ll need to cover the bowl later. Rub down the inside of your chosen bowl with a neutral oil (vegetable, canola, grape seed, avocado, all would be fine here) and set it aside for a moment.
The next step is a good opportunity to vent your frustration that there’s a pandemic and you can’t do what you want to, really make sure you take the time to enjoy this part.
Pour the dough out onto the counter, pick the dough up, and then slap it back down onto the counter. If you’re doing it right, you should hear a definitive slapping noise.
Warning: The dough has a tendency to spray out little dough particles during this step. You probably want to wear an apron and clean off the counter around where you’re doing this or your stuff will be forever covered in tiny dough bits.
If my description of the slapping wasn’t clear, here’s what I mean.
The slapping phase should last about five minutes. I don’t know if there’s any real way to know that you’ve done enough, so I just set a timer for five minutes and hoped it was good.
When you’re done slapping the dough (which I swear is not a euphemism), transfer the dough to the bowl you oiled earlier. If your results are like mine, your countertop will now be a complete mess.

Take a moment to scrape the dough off of your countertop and pick all of the little bits of dough out of your arm hair. When people talk about how fun it is to make bread at home, this is exactly the part they’re talking about.
Bulk Fermentation
At this point, the dough has been formed and it’s mostly a waiting game. The only thing you need to do during this phase is fold the dough every 30 minutes, so cover the bowl and set it somewhere warmish. Claire says 85 degrees Fahrenheit is great, but I just left the dough on the counter with no issues (our apartment is usually about 75 degrees when the sun’s out and the AC is off).
30 minutes later
To prevent the dough from sticking to your hands you’ll need to oil them with a neutral oil (vegetable, canola, etc.). If you don’t have anyone to help you with this, I recommend pouring some oil into a bowl so that you can dip your hands because you’re going to do this a few more times.

With your oiled hands, pick the dough up and drape it back over itself. Then turn the bowl 90 degrees (I mean a quarter turn here, not a temperature) and repeat.
Just in case the description wasn’t super clear.
I believe the most important thing here is that you don’t knock all of the little bubbles out of your dough. Having said that, you can see that I stretched it pretty far and I still ended up with a loaf of bread. So don’t panic if you see a few bubbles pop.
Cover the bowl again and set the dough back somewhere warmish.
You’re supposed to repeat this dough folding process eight times, waiting 30 minutes in between each time. After doing this for three hours and six turns, I was fed up with this step so I moved on. I didn’t notice any detrimental effects, but we’ll never know if it could have been even better.
Shaping the Dough
When the bulk fermentation phase completes, it’s time to shape the dough. For this you will need:
2 baskets, colanders, or strainers
3 clean dish towels
If you’re a hardcore bread baker, you would use a true proofing basket. But, if you’re like me you’ll use the two colanders you have lying around.
To prepare your proofing vessels of choice, drape a clean dish towel across each container and dust the towel pretty heavily with all purpose or bread flour. If you don’t dust the towel well, you run the risk of the towel sticking to your dough and getting little bits of fuzz in your dough.

The baskets can then be set aside while you finish shaping the dough. Retrieve your dough from its warm spot and dump it out of its bowl and onto your counter. This will probably look rather unceremonious.

Using a bench scraper or similar stiff, square-ish thing, you want to make a quick, clean, decisive cut down the middle of the dough to split it into two equal halves. According to Claire, you don’t want to hesitate here. The dough can smell your fear and will pounce on you at the slightest display of weakness.

Once your dough has been cut, shape each half into a rough circle. The two halves are going to have some separation anxiety. Dust the top of them lightly with all purpose or bread flour and cover them with a clean kitchen towel while they learn to thrive as two separate doughs.
After waiting 10 minutes, it’s time to turn your mounds of dough into loaves of bread. First you’ll need to dust the countertop near your dough (in my case, behind my dough) with flour so that you can flip the dough over.

Then lift one mound of dough up and flip it into the floured area. DON’T JUST USE YOUR HANDS HERE! You definitely need to use a bench scraper/spatula/anything supportive to do this successfully. I just tried to use my hands and only succeeded in smearing the dough across the countertop.

Silver lining: I can now use this magic carpet to pick up Jasmine later.
When you’ve got the dough situated nicely on the floured area, you’re ready to shape the dough into a loaf of bread. First tug at the edges to get the dough into a flat, circlish shape. According to Claire you want to do your best to not get flour on the side of the dough that is facing up at this point since it will make it harder for your dough to stick to itself in the next step.
To convert your disc of dough into a loaf, fold the dough like you’re trying to fold an envelope:
Fold the bottom 1/3rd of the dough into the center
Fold the right ¼ of the dough towards the center
Fold the left ¼ of the dough towards the center
Fold the top 1/3rd of the dough down to cover everything.
When the folding is complete, pinch together the area with the seams in a bunch of spots to stitch the dough together. To make sure the whole thing doesn’t burst apart, flip the dough over so that it is sitting seam-side down.
I suspect that an actual demonstration of this is worth a lot more than a quick description, so here ya go.
As you can see, I didn’t absolutely nail this, but it was good enough. When you finish shaping your first piece of dough, you repeat the process with the second piece. I learned from my mistake on the first one and used a bench scraper to flip the dough up into the floured area. The results were much better with approximately 95% less dough smearing across the countertop.

When both loaves have been formed, they need to be transferred into the prepared baskets. This will undoubtedly be nerve wracking since it will feel like you’re about to ruin all of your hard work, but this is another time where the dough can sense your fear so you need to move decisively.
Flip the dough into the basket so that the seam side is UP. I repeat: the seam side should be UP! You should see the area you stitched together earlier. If you accidentally flipped it into the basket seam side down, then pull it out and right your wrong.
The side that is down in the basket will eventually become the top of the bread and the aesthetic will be all wrong if it has a bunch of folds on it.

Once again, you want to dust the dough so that the towel in the basket doesn’t stick to it. When you’re sure you won’t have a sticking disaster, drape the towel over the top of the dough. You should have enough towel sticking out around your basket that you don’t need a second towel. But! If you do need a second towel, just put a second towel on there and don’t panic.
Now your two bundles of soon-to-be bread go into the fridge to work on their flavor overnight. If you didn’t plan for this (and I did not), you may need to wedge them in between the other things you have in your fridge.

Day 2 - The Great Boule Bake Off
After a restful night in the fridge, your bread should now be ready to go into the oven. Do yourself a favor and start preheating your oven right away. Set it to 500 degrees Fahrenheit or as high as it will go. If you live almost anywhere besides the United States, set your oven to 260 degrees celsius. If your oven doesn’t get that hot, just set your oven as hot as it will go and know that you might need to adjust your bake time later.
This recipe calls for baking the bread in dutch oven. Unfortunately I don’t own one and neither my kitchen cabinet space nor my wallet are currently in favor of me buying one on a whim. I used this funky Lodge “Combo Cooker” thing and it worked like a charm. If you’re in the mood to treat yourself or you want to be truly authentic to the original recipe, it looks like they’re using an oval Staub dutch oven in the original video.
Whatever you end up using, you need to cut a piece of parchment to go underneath your bread so that it doesn’t stick. To make your life easier, cut a piece of paper that is slightly larger than the bottom of your dutch oven and cut both pieces of paper upfront. The dutch oven needs to go into the oven to preheat and it’s pretty hard to check if your paper is the right size with a 500 degree dutch oven.
When you’ve cut your parchment papers, put the dutch oven and its lid into the oven. In the episode, Brad says that the dutch oven needs to preheat for about an hour, so make sure you do this in advance.
When your dutch oven has been heating for about an hour, you can get your dough ready. Put one of your pieces of parchment paper on a plate and dust it with flour.

Now it’s time to remove your dough from the basket. Gently turn your dough out onto the parchment paper. This isn’t very hard, but you’re definitely going to end up getting flour all over the place. The towel will probably stick to the dough a bit, but it should peel right off (assuming it was appropriately floured before).
Now comes the only technical part of the second day: scoring the bread. Your first decision here is what you want to score on the bread. In the recipe they just suggest putting a single long slash down the middle of the bread. That’s definitely the easiest thing to do, but I was feeling adventurous after seeing a lot of beautifully scored sourdough online (seriously, look at these!).
We watched one 10 minute YouTube video on how to score bread and it looked so easy. To score the bread, you’re supposed to use a “lame” (pronounced like “lawn” but with an “m”) which is French for “blade”. Unfortunately, I don’t own that either, so instead we just used a clean razor blade that we had lying around…that’s normal right? It’s unclear if this was less effective than using the actual tool for the job, but it seemed to work.
If you don’t have a lame or a razor blade lying around, I’m sure you can use a very sharp knife and it will be just fine.

It turns out that scoring bread is slightly more difficult than they make it look on YouTube.
There was definitely a moment during scoring where we thought we had just destroyed hours worth of work. But in the end we still managed to get a decent looking pattern.

When the bread is scored you want to make sure you don’t waste a lot of time since a bit of the gas trapped inside your dough will start to escape. Grab your dutch oven out of the oven and plop your bread in with one swift motion. This is definitely going to be nerve wracking because the dutch oven will be super hot. Just power through the fear and throw it in there!

If the parchment comes up around the side of the bread a little bit, that’s not a problem.
Now put the lid on your bread and put it back in the oven. The bread goes in for 15 minutes with the lid on and then an additional 30 to 40 minutes uncovered. If you’re using something like the Lodge “Combo Cooker” thing that I used, then I recommend making sure that the handles are slightly offset so that you don’t have to fiddle too much in the 500 degree oven when you go to remove the lid.

According to the baking experts, keeping the lid on at the start helps trap steam around the bread which gives it a nice crusty exterior. You may have seen other bread recipes that call for misting the bread with some water before you bake it, but nothing like that is required here.
After 15 minutes in the oven, I removed the lid and the bread had risen considerably from the flat-ish disk that it was at the start.

Depending on how deep you scored, certain areas will be more or less expanded.
After another 30 to 40 minutes (in my case, 30 minutes), your bread is ready to come out of the oven and WOW does it look good.

When you pull your bread out of the oven, transfer it out of the pan and onto a wire rack or somewhere else to cool. Your dutch oven should go back into the oven with the lid on so that you can bake your second loaf.
To double check that your bread is done, tap the bottom. If the bread sounds kind of hollow when you tap on the bottom, then you’re in good shape.
At this point you’ll probably notice that the bread feels insanely firm and the crust is hard as a rock. Don’t worry, once the steam that’s trapped inside the bread has a chance to soften the crust, you’ll get a lovely crust.
Since the steam inside the bread needs time to work its magic, make sure you wait at least two hours before cutting into your bread. Waiting to cut into the bread is potentially the most excruciating part of this recipe. It takes so long to make this bread and then when it’s done, you have to wait even longer.
To ease your suffering, fill your time by repeating all of the baking steps above with your second loaf. That should eat up at least five minutes of your two hour wait.

Ok, so we didn’t totally nail the scoring.
Two Hours Later
Finally, after what feels like an eternity, it’s time to cut into the bread. This is a big moment because sourdough bread is a bit of a gamble. Sometimes you can end up with absolutely massive air pockets inside your bread.

But no problems this time! At this point it will be impossible to resist cutting a slice of the bread and just stuffing it in your face, so go ahead and do that. My bread turned out beautifully with a delightful chew to the crust and an incredibly soft interior. The spelt flour also adds a nice bit of flavor.
When you’re finished wolfing down your first slice, this bread pairs excellently with cheese, cured meat, and wine. Oddly, all things that take a long time to make.

We put this amount of bread on to be polite, we ate way more than this.
Would I recommend this bread? Absolutely, I’m giving this bread a 5/5 because I can’t think of a single thing I would change about it. It takes a long time, but no individual step is super complicated and the end results are fantastic.
If you need a quick recap of the recipe or you aren’t interested in reading about my experience making this bread, this section is for you.
Ingredients:
750 grams of white bread flour
150 grams of whole wheat flour
100 grams of spelt, rye, or more whole wheat flour
750 grams of water
50 additional grams of water
200 grams of sourdough starter
20 grams of salt
Additional flour for dusting
1. Form the autolyse mixture
In a large bowl, combine:
750 grams of white bread flour
150 grams of whole wheat flour
100 grams of spelt/rye/more whole wheat flour
Stir thoroughly to make sure the flours are well combined.
Add the 750 grams of water to the flour and mix until no dry flour remains.
Wait 30 minutes.
2. Add the sourdough starter
Add 200 grams of sourdough starter to the autolyse mixture. Using your hands, pinch/mash the sourdough starter into the mixture. When the starter is well incorporated, add 20 grams of salt and 50 grams of water to the mixture. Use your hands to combine everything well.
3. Slap and fold the dough
Pick the dough up out of the bowl and place it on a work surface/countertop. Pick the dough up and throw it down onto the counter. It should make a definitive slapping noise. Repeat this process for 5 minutes.
4. Bulk fermentation
Oil a large bowl or other container with a neutral oil like vegetable oil or canola oil. Place your dough into the bowl and cover it using a lid or plastic wrap. Put the bowl somewhere warmish (at least 70 degrees Fahrenheit or 21 degrees celsius).
Wait 30 minutes.
Oil your hands with a neutral oil (vegetable, canola, etc.). Gently pick the dough up out of the bowl (it should be fairly slack) and fold it over on itself. Be careful not to force all of the air out of your dough. Rotate the container 90 degrees and repeat the folding process.
Repeat this folding step every 30 minutes for the next 3.5 hours. In total you should fold the dough 8 times and 4 hours should pass.
5. Shaping the dough
Line 2 baskets, colanders, or strainers with a clean dish towel. Dust the baskets generously with bread flour or all purpose flour.
Pour the dough out of its bowl onto your work surface. Cut the dough in half using a bench scraper. Shape each half into a rough circle. Dust the top of the dough with more bread flour or all purpose flour. Cover the dough with a clean kitchen towel.
Wait 10 minutes.
Generously dust your work surface in front of the dough. Working one piece at a time, flip the dough onto the floured area using a bench scraper. Gently tug at the edges of the dough to flatten it a bit and form a circle. Do your best not to get flour onto the side of the dough that is unfloured.
Fold the dough like you are trying to fold a letter:
Fold the bottom 1/3rd of the dough up towards the center.
Fold the sides in to join at the middle.
Fold the top 1/3rd down towards the center.
Stitch the dough together by pinching and twisting along the seam in the dough. Flip the dough over onto the seam side to make sure the seam will stay together.
Get your previously prepared baskets and transfer the dough into the baskets seam side UP. Dust the top of the dough with bread flour or all purpose flour and drape the dish towel that lines the basket over the top of the dough.
Transfer your dough to the fridge and let it rest overnight.
6. Prepare for baking your bread
Preheat your oven to 500 degrees Fahrenheit (260 degrees celsius) or as close to that as you can get.
Cut two pieces of parchment paper to fit the bottom of a dutch oven or other heavy baking vessel such as a deep cast iron pan with a lid. Place your dutch oven and its lid in the oven and allow it to preheat for 1 hour.
Place one piece of parchment paper on a plate. Dust the parchment paper with bread flour or all purpose flour. Retrieve one basket of dough from the fridge. Turn the dough out onto the parchment paper.
7. Score the dough
Using a bakers’ lame, clean razor blade, or exceptionally sharp knife, score a decorative design or cut a single long gash across the top of the dough that is approximately ¼ of an inch to ½ of an inch.
8. Bake the bread
Retrieve your dutch oven from the oven. In one swift motion, slide your parchment paper and dough off of the plate and into the dutch oven. Cover the dutch oven and return it to the oven.
Bake with the lid on for 15 minutes. Then, remove the lid and bake for an additional 30 to 40 minutes. Remove the bread from the oven and transfer it to a wire rack.
To check if the bread is done, tap on the bottom of the bread. If it sounds hollow when tapped, it is done.
9. Repeat with other dough
Repeat steps 6, 7, and 8 with your second piece of dough.
10. Let the bread cool
Let the bread cool for 2 hours before cutting into it.
11. Enjoy
Enjoy your fresh bread however you like :)